どうしてこんなにわかりにくいのだろうか。。
ここを見たけどうまくいかず
https://docs.microsoft.com/ja-jp/azure/key-vault/tutorial-net-create-vault-azure-web-app
これに挑戦してようやく
https://news.mynavi.jp/article/zeroazure-23/
はじめに
KeyVaultにServiceBusの接続情報をシークレットという形式で格納することで、Functionsにハードコーディングせずに済むという話。KeyVaultにFunctionsがシークレット情報ください、と問い合わせるわけだが、当然誰彼構わずわたすわけではなく。特定の認証された人にだけ渡すようになっている。これがマネージドID。
大まかな流れ
1.KeyVault(キーコンテナ)を作成
2.作成したキーコンテナにシークレット情報を格納
⇒この時シークレット識別子というのがアサインされるので、これをメモしておく。
3.VisualStadioでキーコンテナからシークレット情報を参照するコーディングを行う
(VSの新規プロジェクト>ASP.Core Web アプリケーションのテンプレートを指定)
// キーコンテナーのDNS名を設定するvarkeyVaultEndpoint="https://keyvault-je-001.vault.azure.net/";// Azure Key Vaultに接続するための追加の設定を記述する// 1.アプリをAzureに認証するためのアクセストークン取得プロバイダーのインスタンス化varazureServiceTokenProvider=newAzureServiceTokenProvider();// 2.Azure Key Vaultに接続するためのクライアントのインスタンス化varkeyVaultClient=newKeyVaultClient(newKeyVaultClient.AuthenticationCallback(azureServiceTokenProvider.KeyVaultTokenCallback));// 3.Azure Key Vault(キーコンテナー)からシークレットにアクセスするための設定をbuilderに追加builder.AddAzureKeyVault(keyVaultEndpoint,keyVaultClient,newDefaultKeyVaultSecretManager());4.デプロイして、テスト!してもつながりません。(500系エラー)
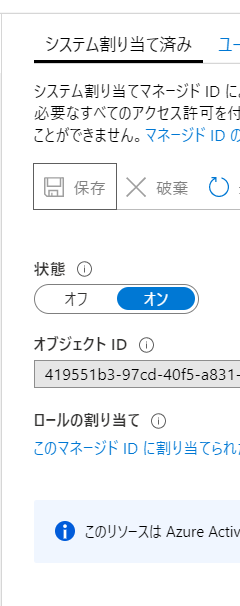
5.デプロイしたWebAppsのIDを選択し、こんな感じでオンに切り替えて保存
6.キーコンテナ>アクセスポリシーから「+アクセスポリシーの追加」を選択
7.さっきWebAppsでオンに切り替えたときに作成されたIDが選択可能になっているはずなので、選択してシークレットの一覧、参照を有効にして保存。
後記
Azure Key Vault を使用してサーバー アプリのシークレットを管理する
.NET Core の公式の Key Vault クライアントは、Microsoft.Azure.KeyVault NuGet パッケージの KeyVaultClient クラスです。 これを直接使用する必要はありませんが、— と ASP.NET Core の AddAzureKeyVault メソッドを使用すると、起動時にコンテナーのすべてのシークレットを Configuration API に読み込むことができます。 この手法では、残りの構成で使用するものと同じ IConfiguration インターフェイスを使用して、すべてのシークレットに名前を指定してアクセスできます。 AddAzureKeyVault を使用するアプリには、コンテナーに対する Get と List の両方のアクセス許可が必要です。
マイナビのサイトもMSのLearningでも実装方法はほぼ同じなことに気づきました。
MSのLearningだとProgram.cs内でわずかにこれだけ。キーコンテナを丸ごと読み込んで、必要なものだけアプリ内で抽出して(SeacretNameとの一致するものだけ)利用してるんですね。
usingMicrosoft.AspNetCore;usingMicrosoft.AspNetCore.Hosting;usingMicrosoft.Extensions.Configuration;namespaceKeyVaultDemoApp{publicclassProgram{publicstaticvoidMain(string[]args){CreateWebHostBuilder(args).Build().Run();}publicstaticIWebHostBuilderCreateWebHostBuilder(string[]args)=>WebHost.CreateDefaultBuilder(args).ConfigureAppConfiguration((context,config)=>{// Build the current set of configuration to load values from// JSON files and environment variables, including VaultName.varbuiltConfig=config.Build();// Use VaultName from the configuration to create the full vault URL.varvaultUrl=$"https://{builtConfig["VaultName"]}.vault.azure.net/";// Load all secrets from the vault into configuration. This will automatically// authenticate to the vault using a managed identity. If a managed identity// is not available, it will check if Visual Studio and/or the Azure CLI are// installed locally and see if they are configured with credentials that can// access the vault.config.AddAzureKeyVault(vaultUrl);}).UseStartup<Startup>();}}usingSystem;usingMicrosoft.AspNetCore.Http;usingMicrosoft.AspNetCore.Mvc;usingMicrosoft.Extensions.Configuration;namespaceKeyVaultDemoApp.Controllers{[Route("api/[controller]")]publicclassSecretTestController:ControllerBase{privatereadonlyIConfiguration_configuration;publicSecretTestController(IConfigurationconfiguration){_configuration=configuration;// ★ごそっと一括で取得}[HttpGet]publicIActionResultGet(){// Get the secret value from configuration. This can be done anywhere// we have access to IConfiguration. This does not call the Key Vault// API, because the secrets were loaded at startup.varsecretName="SecretPassword";varsecretValue=_configuration[secretName];// ★配列みたいなもので一致しているものだけとっている?if(secretValue==null){returnStatusCode(StatusCodes.Status500InternalServerError,$"Error: No secret named {secretName} was found...");}else{returnContent($"Secret value: {secretValue}"+Environment.NewLine+Environment.NewLine+"This is for testing only! Never output a secret "+"to a response or anywhere else in a real app!");}}}}