■はじめに
今回は画面内にヘルプページを表示するサンプルと、画面パーツを別xamlにするやり方を学びます。
これらの実装例として、正規表現の動作確認ツールを作ります。
■開発環境
- Windows 10
- Visual Studio Community 2019 (Version 16.8.2)
- .NET Framework 4.6.2 / .NET Core 3.1 / .NET 5.0
■プロジェクト作成
RegexTesterという名前でプロジェクトを作成します。
◇.NET Frameworkの場合


◇.NET Core 3.1 / .NET 5.0の場合


■プロジェクトの設定
◇.NET Core 3.1の場合
プロジェクトを右クリック、「プロパティ」で「対象のフレームワーク」を.NET Core 3.1に設定します。
◇.NET 5.0の場合
プロジェクトを右クリック、「プロパティ」で「対象のフレームワーク」を.NET 5.0に設定します。
プロジェクトをダブルクリックし、
csprojファイルのSdkがMicrosoft.NET.Sdk.WindowsDesktopになっていたらMicrosoft.NET.Sdkに編集します。
■メイン画面の枠組み作成
Gridを分割し、上にタブ、下に閉じるボタンを配置します。
<Windowx:Class="RegexTester.MainWindow"xmlns="http://schemas.microsoft.com/winfx/2006/xaml/presentation"xmlns:x="http://schemas.microsoft.com/winfx/2006/xaml"xmlns:d="http://schemas.microsoft.com/expression/blend/2008"xmlns:local="clr-namespace:RegexTester"xmlns:mc="http://schemas.openxmlformats.org/markup-compatibility/2006"Title="Regex Tester .NET"Width="800"Height="450"ResizeMode="CanResizeWithGrip"mc:Ignorable="d"><Grid><Grid.RowDefinitions><!-- タブ行 --><RowDefinition/><!-- ボタン行 --><RowDefinitionHeight="Auto"/></Grid.RowDefinitions><TabControlMargin="6"><TabItemHeader="マッチング"></TabItem><TabItemHeader="ヘルプ"></TabItem></TabControl><StackPanelGrid.Row="1"><ButtonWidth="150"Margin="12,6"HorizontalAlignment="Right"Content="閉じる(_C)"/></StackPanel></Grid></Window>■画面パーツ用意

プロジェクトを右クリック、「追加」-「新しいフォルダー」でViewsと入力してください。
「Views」フォルダー内にPagesフォルダーを作成してください。

「Pages」フォルダーを右クリック、「追加」-「ユーザーコントロール(WPF)」でMatchingContentと入力してください。
同様に「Pages」フォルダにユーザーコントロールHelpContentを追加してください。
■タブのコンテンツ組み込み
追加したコントロールをメイン画面の各タブで参照します。
MainWindow.xamlのWindowにxmlns:page="clr-namespace:RegexTester.Views.Pages"を追加してください。
<Window:xmlns:page="clr-namespace:RegexTester.Views.Pages":そして、TabItemの中にpage:の後に先ほど追加したユーザーコントロールの名前を書きます。
<TabControlMargin="6"><TabItemHeader="マッチング"><page:MatchingContent/></TabItem><TabItemHeader="ヘルプ"><page:HelpContent/></TabItem></TabControl>pageの部分は任意の名前を付けられます。xmlns:abc="clr-namespace:RegexTester.Views.Pages"としていたら<abc:MatchingContent />という書き方でPagesフォルダのコントロールを参照できます。
ここまでで一度ビルドしておきましょう。
■ヘルプ内容作成
◇画面
「ヘルプ」タブに表示する内容を作ります。
HTMLのテーブル風のリファレンスとURLリンクを作ります。
Xamlの書き方もHTMLのTableと少し似ています。
<UserControlx:Class="RegexTester.Views.Pages.HelpContent"xmlns="http://schemas.microsoft.com/winfx/2006/xaml/presentation"xmlns:x="http://schemas.microsoft.com/winfx/2006/xaml"xmlns:d="http://schemas.microsoft.com/expression/blend/2008"xmlns:local="clr-namespace:RegexTester.Views.Pages"xmlns:mc="http://schemas.openxmlformats.org/markup-compatibility/2006"d:DesignHeight="500"d:DesignWidth="800"mc:Ignorable="d"><FlowDocumentScrollViewer><FlowDocument><Section><Paragraph><Bold>■正規表現クイックリファレンス</Bold></Paragraph><TableFontFamily="JetBrains Mono, Cascadia Code, BIZ UDGothic, Yu Gothic Medium, Meiryo"><Table.Resources><StyleTargetType="TableCell"><SetterProperty="BorderBrush"Value="Silver"/><SetterProperty="BorderThickness"Value="0.5"/></Style></Table.Resources><Table.Columns><TableColumnWidth="*"/><TableColumnWidth="4*"/></Table.Columns><TableRowGroup><TableRow><TableCell><Paragraph>.</Paragraph></TableCell><TableCell><Paragraph>任意の1文字</Paragraph></TableCell></TableRow></TableRowGroup><TableRowGroup><TableRow><TableCell><Paragraph>*</Paragraph></TableCell><TableCell><Paragraph>直前の要素の0回以上繰り返し</Paragraph></TableCell></TableRow></TableRowGroup><TableRowGroup><TableRow><TableCell><Paragraph>+</Paragraph></TableCell><TableCell><Paragraph>直前の要素の1回以上繰り返し</Paragraph></TableCell></TableRow></TableRowGroup><TableRowGroup><TableRow><TableCell><Paragraph>?</Paragraph></TableCell><TableCell><Paragraph>直前の要素の0~1回繰り返し</Paragraph></TableCell></TableRow></TableRowGroup><TableRowGroup><TableRow><TableCell><Paragraph>^</Paragraph></TableCell><TableCell><Paragraph>行頭</Paragraph></TableCell></TableRow></TableRowGroup><TableRowGroup><TableRow><TableCell><Paragraph>$</Paragraph></TableCell><TableCell><Paragraph>行末</Paragraph></TableCell></TableRow></TableRowGroup><TableRowGroup><TableRow><TableCell><Paragraph>{🥝}</Paragraph></TableCell><TableCell><Paragraph>直前の要素の🥝回繰り返し</Paragraph></TableCell></TableRow></TableRowGroup><TableRowGroup><TableRow><TableCell><Paragraph>{🥝,}</Paragraph></TableCell><TableCell><Paragraph>直前の要素の🥝回以上繰り返し</Paragraph></TableCell></TableRow></TableRowGroup><TableRowGroup><TableRow><TableCell><Paragraph>{🥝,🍉}</Paragraph></TableCell><TableCell><Paragraph>直前の要素の🥝~🍉回繰り返し</Paragraph></TableCell></TableRow></TableRowGroup><TableRowGroup><TableRow><TableCell><Paragraph>[🥝]</Paragraph></TableCell><TableCell><Paragraph>🥝内の任意の1文字</Paragraph></TableCell></TableRow></TableRowGroup><TableRowGroup><TableRow><TableCell><Paragraph>[^🥝]</Paragraph></TableCell><TableCell><Paragraph>🥝内にない任意の1文字</Paragraph></TableCell></TableRow></TableRowGroup><TableRowGroup><TableRow><TableCell><Paragraph>[🥝-🍉]</Paragraph></TableCell><TableCell><Paragraph>文字範囲🥝から🍉までの任意の1文字</Paragraph></TableCell></TableRow></TableRowGroup><TableRowGroup><TableRow><TableCell><Paragraph>()</Paragraph></TableCell><TableCell><Paragraph>グループ</Paragraph></TableCell></TableRow></TableRowGroup><TableRowGroup><TableRow><TableCell><Paragraph>(?:🥝)</Paragraph></TableCell><TableCell><Paragraph>非キャプチャ グループ</Paragraph></TableCell></TableRow></TableRowGroup><TableRowGroup><TableRow><TableCell><Paragraph>
(?<🍇>🥝)
</Paragraph></TableCell><TableCell><Paragraph>名前付きグループ。🍇がグループ名</Paragraph></TableCell></TableRow></TableRowGroup></Table></Section><Section><Paragraph><Bold>■もっと詳しく</Bold></Paragraph><Paragraph><HyperlinkNavigateUri="https://docs.microsoft.com/ja-jp/dotnet/standard/base-types/regular-expressions"RequestNavigate="Hyperlink_RequestNavigate">
.NET の正規表現 | Microsoft Docs
</Hyperlink></Paragraph></Section></FlowDocument></FlowDocumentScrollViewer></UserControl>◇ロジック
◎.NET Frameworkの場合
usingSystem.Windows.Controls;usingSystem.Windows.Navigation;namespaceRegexTester.Views.Pages{/// <summary>/// HelpContent.xaml の相互作用ロジック/// </summary>publicpartialclassHelpContent:UserControl{publicHelpContent(){InitializeComponent();}privatevoidHyperlink_RequestNavigate(objectsender,RequestNavigateEventArgse){// URLを開くSystem.Diagnostics.Process.Start(e.Uri.AbsoluteUri);}}}◎.NET Core 3.1 / .NET 5.0の場合
usingSystem.Windows.Controls;usingSystem.Windows.Navigation;namespaceRegexTester.Views.Pages{/// <summary>/// HelpContent.xaml の相互作用ロジック/// </summary>publicpartialclassHelpContent:UserControl{publicHelpContent(){InitializeComponent();}privatevoidHyperlink_RequestNavigate(objectsender,RequestNavigateEventArgse){varp=newSystem.Diagnostics.Process();p.StartInfo.FileName=e.Uri.AbsoluteUri;p.StartInfo.UseShellExecute=true;// URLを開くp.Start();}}}作り終わったらビルドし、MainWindowで「ヘルプ」タブを選択してみましょう。
ちゃんと「ヘルプ」タブ内に表示されました。
■メインコンテンツ作成
「マッチング」タブに表示する内容を作ります。
<UserControlx:Class="RegexTester.Views.Pages.MatchingContent"xmlns="http://schemas.microsoft.com/winfx/2006/xaml/presentation"xmlns:x="http://schemas.microsoft.com/winfx/2006/xaml"xmlns:d="http://schemas.microsoft.com/expression/blend/2008"xmlns:local="clr-namespace:RegexTester.Views.Pages"xmlns:mc="http://schemas.openxmlformats.org/markup-compatibility/2006"d:DesignHeight="450"d:DesignWidth="800"mc:Ignorable="d"><UserControl.Resources><StyleTargetType="Label"><SetterProperty="Margin"Value="6,6,6,0"/></Style><StyleTargetType="TextBox"><SetterProperty="Margin"Value="6,0,6,6"/><SetterProperty="FontFamily"Value="JetBrains Mono, Cascadia Code, BIZ UDGothic, Yu Gothic Medium, Meiryo"/></Style><StyleTargetType="CheckBox"><SetterProperty="Margin"Value="6"/></Style></UserControl.Resources><Grid><Grid.RowDefinitions><!-- 上部(検索文字列) --><RowDefinitionHeight="Auto"MinHeight="60"/><!-- スプリッター --><RowDefinitionHeight="Auto"/><!-- 下部(正規表現パターン~結果) --><RowDefinition/></Grid.RowDefinitions><Grid><Grid.RowDefinitions><RowDefinitionHeight="Auto"/><!-- 文字列テキスト行 --><RowDefinition/></Grid.RowDefinitions><LabelContent="文字列(_I)"Target="{Binding ElementName=InTxt}"/><TextBoxx:Name="InTxt"Grid.Row="1"AcceptsReturn="True"AcceptsTab="False"Text=""TextWrapping="Wrap"VerticalScrollBarVisibility="Visible"/></Grid><GridSplitterGrid.Row="1"Height="6"Margin="0,1"HorizontalAlignment="Stretch"/><GridGrid.Row="2"><Grid.RowDefinitions><RowDefinitionHeight="Auto"/><!-- 結果のテキスト行 --><RowDefinition/></Grid.RowDefinitions><StackPanel><LabelContent="正規表現パターン(_P)"Target="{Binding ElementName=RegPtn}"/><TextBoxx:Name="RegPtn"Text=""/><StackPanelOrientation="Horizontal"><CheckBoxx:Name="ROptIgnoreCase"Content="大文字小文字の区別をしない(_O)"/><CheckBoxx:Name="ROptMultiLine"Content="複数行モード(_M)"/><CheckBoxx:Name="ROptSingleLine"Content="単一行モード(_S)"/><ButtonMargin="12,0"Padding="18,0"Click="RunButton_Click"Content="実行(_E)"ToolTip="マッチングを実行します"/></StackPanel><LabelContent="結果(_R)"Target="{Binding ElementName=OutTxt}"/></StackPanel><TextBoxx:Name="OutTxt"Grid.Row="1"IsReadOnly="True"Text=""VerticalScrollBarVisibility="Visible"/></Grid></Grid></UserControl>usingSystem;usingSystem.Text;usingSystem.Text.RegularExpressions;usingSystem.Windows;usingSystem.Windows.Controls;namespaceRegexTester.Views.Pages{/// <summary>/// MatchingContent.xaml の相互作用ロジック/// </summary>publicpartialclassMatchingContent:UserControl{publicMatchingContent(){InitializeComponent();}/// <summary>/// 実行ボタンクリック/// </summary>/// <param name="sender"></param>/// <param name="e"></param>privatevoidRunButton_Click(objectsender,RoutedEventArgse){this.IsEnabled=false;ExecuteMatching(InTxt.Text,RegPtn.Text,GetRegexOptions());this.IsEnabled=true;}/// <summary>/// マッチング実行/// </summary>/// <param name="input">文字列</param>/// <param name="regPattern">正規表現パターン</param>/// <param name="regOpt">検索オプション</param>publicvoidExecuteMatching(stringinput,stringregPattern,RegexOptionsregOpt){OutTxt.Clear();// 未入力がないかチェックif(IsAnyNullOrEmpties(input,regPattern)){MessageBox.Show("未入力の項目があります。");return;}try{varreg=newRegex(regPattern,regOpt);// マッチング実行MatchCollectionmatches=reg.Matches(input);if(matches.Count==0){OutTxt.Text="★マッチなし★";return;}varsb=newStringBuilder();sb.Append($"★{matches.Count}件マッチ★\n");foreach(Matchminmatches){sb.Append($"{m.Value}\n");}sb.Append("--------------------\n");sb.Append("【グループ名】\n");foreach(Matchminreg.Matches(input)){foreach(stringgNameinreg.GetGroupNames()){sb.Append($"{gName} => {m.Groups[gName].Value}\n");}}// 結果を設定OutTxt.Text=sb.ToString();}catch(Exceptionex){MessageBox.Show(ex.ToString());}}/// <summary>/// 未入力チェック/// </summary>/// <param name="values"></param>/// <returns>全部入力されていればfalse</returns>privateboolIsAnyNullOrEmpties(paramsstring[]values){foreach(stringvalueinvalues){if(string.IsNullOrEmpty(value)){// 未入力returntrue;}}returnfalse;}/// <summary>/// 画面から正規表現オプション取得/// </summary>/// <returns></returns>privateRegexOptionsGetRegexOptions(){varopt=RegexOptions.None;// 大文字小文字の区別をしないif(ROptIgnoreCase.IsChecked==true){opt|=RegexOptions.IgnoreCase;}// 複数行モードif(ROptMultiLine.IsChecked==true){opt|=RegexOptions.Multiline;}// 単一行モードif(ROptSingleLine.IsChecked==true){opt|=RegexOptions.Singleline;}returnopt;}}}作り終わったらビルドし、MainWindowで「マッチング」タブを見てみましょう。
■メイン画面外枠部分の実装
「閉じる」ボタンの処理を書きます。
:
<StackPanelGrid.Row="1"><ButtonWidth="150"Margin="12,6"HorizontalAlignment="Right"Click="CloseButton_Click"Content="閉じる(_C)"/></StackPanel>usingSystem.Windows;namespaceRegexTester{/// <summary>/// MainWindow.xaml の相互作用ロジック/// </summary>publicpartialclassMainWindow:Window{publicMainWindow(){InitializeComponent();}privatevoidCloseButton_Click(objectsender,RoutedEventArgse){Close();}}}■実行
「文字列」のテキストボックスに検索対象の文字列を入力し、
「正規表現パターン」のテキストボックスに検索する正規表現を入力し、実行ボタンを押します。
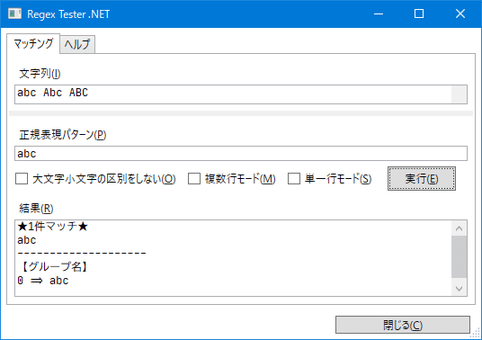
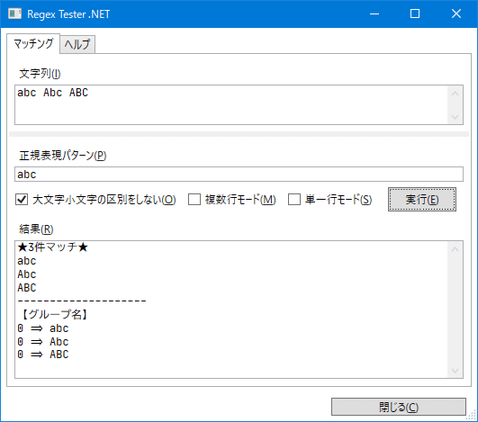
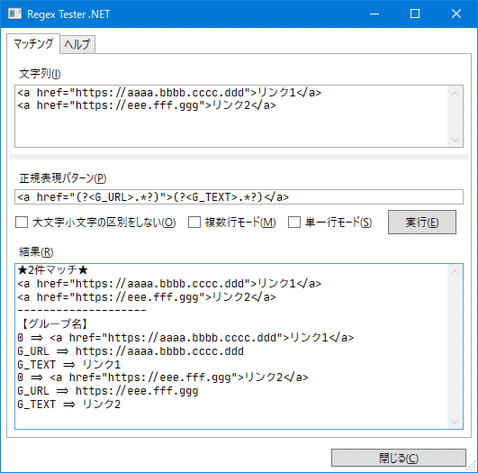
おしまい