このドキュメントの概要
前回はActivity Creator のWizardでの設定項目と、実際にUiPath Studioのプロパティパネルやデザイナーパネルでどのように反映されるかを見ました。
今回は、Activity Creatorのデザイナーパネル上でのアクティビティの外観の設定方法について見ていきます。
Activities.Designプロジェクトについて
Activity CreatorのWizardでアクティビティを追加すると、名称.Activities.DesignプロジェクトのDesignersフォルダ以下に外観に関するファイルが追加されます。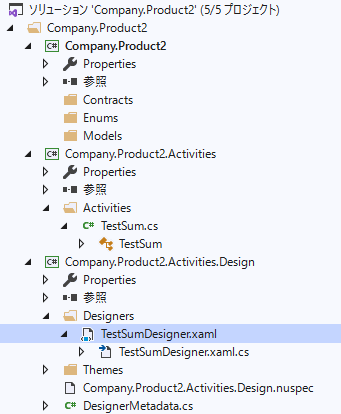
この生成されたファイルを編集することにより、アクティビティの外観を変更することができます。
外観の変更方法
今回はその2で作成したtestSumアクティビティを作成する際に自動生成された、testSumDesinger.xamlを使います。まず、このファイルをVisual Studioで開くと以下のような画面になります。
実際の設定変更はウインドウ下部のxamlを変更します。
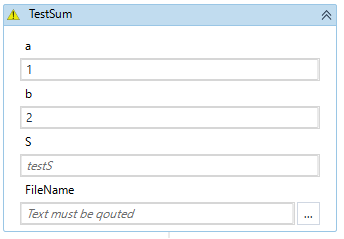
今回のケースはRequiredとして指定したa b 2つのプロパティが、デザイナーパネル上のアクティビティ上にテキストボックスとして表示されています。これに新たに追加した、InArgument<int>型のSプロパティのテキストボックスを追加してみます。
以下は自動生成されたxamlの一部を抜粋したものです。
(略)
    <uip:ActivityDecoratorControlStyle="{StaticResource ActivityDecoratorStyle}"><GridWidth="300"><Grid.RowDefinitions><RowDefinitionHeight="Auto"/><RowDefinitionHeight="Auto"/><RowDefinitionHeight="Auto"/><RowDefinitionHeight="Auto"/></Grid.RowDefinitions><LabelContent="{x:Static activity:Resources.TestSum_A_DisplayName}"Grid.Row="0"/><sapv:ExpressionTextBoxGrid.Row="1"ExpressionType="{Binding ModelItem.Properties[A].PropertyType.GenericTypeArguments[0]}"OwnerActivity="{Binding Path=ModelItem}"HintText="{x:Static activity:Resources.TestSum_A_Description}"UseLocationExpression="False"><sapv:ExpressionTextBox.Expression><BindingPath="ModelItem.A"Converter="{StaticResource ArgumentToExpressionConverter}"Mode="TwoWay"ConverterParameter="In"UpdateSourceTrigger="PropertyChanged"/></sapv:ExpressionTextBox.Expression></sapv:ExpressionTextBox><LabelContent="{x:Static activity:Resources.TestSum_B_DisplayName}"Grid.Row="2"/><sapv:ExpressionTextBoxGrid.Row="3"ExpressionType="{Binding ModelItem.Properties[B].PropertyType.GenericTypeArguments[0]}"OwnerActivity="{Binding Path=ModelItem}"HintText="{x:Static activity:Resources.TestSum_B_Description}"UseLocationExpression="False"><sapv:ExpressionTextBox.Expression><BindingPath="ModelItem.B"Converter="{StaticResource ArgumentToExpressionConverter}"Mode="TwoWay"ConverterParameter="In"UpdateSourceTrigger="PropertyChanged"/></sapv:ExpressionTextBox.Expression></sapv:ExpressionTextBox></Grid></uip:ActivityDecoratorControl>
(略)
これを以下のようにします。
(略)
    <uip:ActivityDecoratorControlStyle="{StaticResource ActivityDecoratorStyle}"><GridWidth="300"><Grid.RowDefinitions><RowDefinitionHeight="Auto"/><RowDefinitionHeight="Auto"/><RowDefinitionHeight="Auto"/><RowDefinitionHeight="Auto"/><RowDefinitionHeight="Auto"/><RowDefinitionHeight="Auto"/></Grid.RowDefinitions><LabelContent="{x:Static activity:Resources.TestSum_A_DisplayName}"Grid.Row="0"/><sapv:ExpressionTextBoxGrid.Row="1"ExpressionType="{Binding ModelItem.Properties[A].PropertyType.GenericTypeArguments[0]}"OwnerActivity="{Binding Path=ModelItem}"HintText="{x:Static activity:Resources.TestSum_A_Description}"UseLocationExpression="False"><sapv:ExpressionTextBox.Expression><BindingPath="ModelItem.A"Converter="{StaticResource ArgumentToExpressionConverter}"Mode="TwoWay"ConverterParameter="In"UpdateSourceTrigger="PropertyChanged"/></sapv:ExpressionTextBox.Expression></sapv:ExpressionTextBox><LabelContent="{x:Static activity:Resources.TestSum_B_DisplayName}"Grid.Row="2"/><sapv:ExpressionTextBoxGrid.Row="3"ExpressionType="{Binding ModelItem.Properties[B].PropertyType.GenericTypeArguments[0]}"OwnerActivity="{Binding Path=ModelItem}"HintText="{x:Static activity:Resources.TestSum_B_Description}"UseLocationExpression="False"><sapv:ExpressionTextBox.Expression><BindingPath="ModelItem.B"Converter="{StaticResource ArgumentToExpressionConverter}"Mode="TwoWay"ConverterParameter="In"UpdateSourceTrigger="PropertyChanged"/></sapv:ExpressionTextBox.Expression></sapv:ExpressionTextBox><LabelContent="{x:Static activity:Resources.TestSum_S_DisplayName}"Grid.Row="4"/><sapv:ExpressionTextBoxGrid.Row="5"ExpressionType="{Binding ModelItem.Properties[S].PropertyType.GenericTypeArguments[0]}"OwnerActivity="{Binding Path=ModelItem}"HintText="{x:Static activity:Resources.TestSum_S_Description}"UseLocationExpression="False"><sapv:ExpressionTextBox.Expression><BindingPath="ModelItem.S"Converter="{StaticResource ArgumentToExpressionConverter}"Mode="TwoWay"ConverterParameter="In"UpdateSourceTrigger="PropertyChanged"/></sapv:ExpressionTextBox.Expression></sapv:ExpressionTextBox></Grid></uip:ActivityDecoratorControl>
(略)
ポイントは2つあります。
一つ目は、<Grid.RowDefinitions>要素に<RowDefinition>要素を必要数分追加することです。これにより表示領域が追加されます。今回は他のプロパティも1つあたり2行としているので、同じく2行分追加しました。
二つ目はLabel要素とsapv:ExpessionTextBox.Expression要素をa,bと同様の書式で追加することです。
ただしBinding先をSにしてあげる点(Binding ModelItem.Properties[S].PropertyType.GenericTypeArguments[0]の部分です。)と各Resourceから呼び出している情報について個別に定義を追加する必要がある点は注意してください。
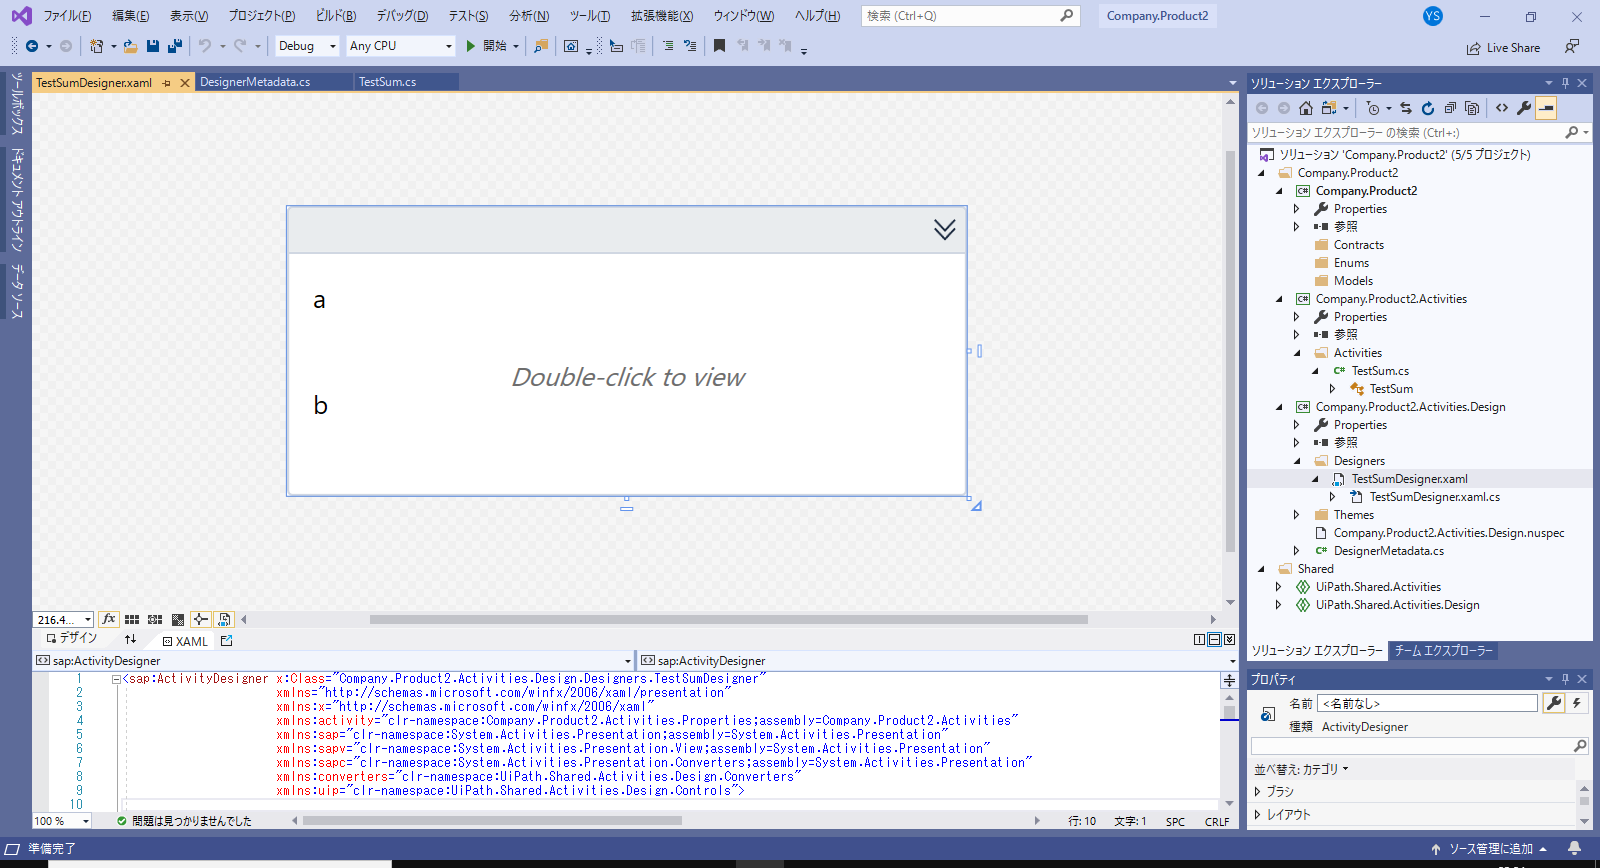
以下のような外観になります。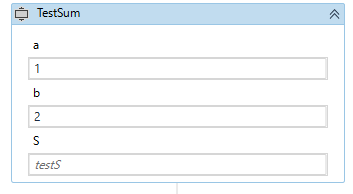
もしResourceを追加しているにも関わらずVisual Studio上でResource未定義のエラーが解消されない場合は、一度Visual Studioを再起動した方が良いかもしれません。
Activity Creatorで用意されているパーツの利用
Activity Creator独自で用意されているパーツがいくつかあります。その中の一つFilePathControlを使ってみましょう。
InArgument<string>型のプロパティFilePathを追加した上で、行領域を確保した後、以下のLabel要素を追加してみてください。
(略)
<LabelContent="{x:Static activity:Resources.TestSum_FileName_DisplayName}"Grid.Row="6"/><uip:FilePathControlGrid.Row="7"ModelItem="{Binding ModelItem}"PropertyName="FileName"Expression="{Binding Path=ModelItem.FileName, Converter={StaticResource ArgumentToExpressionConverter}, ConverterParameter=In, Mode=TwoWay}"/>
(略)
以下のようにファイルパス選択ボタンがあるテキストボックスが追加されました。
ツールチップアイコンの変更
続いてツールチップアイコンの変更の仕方について説明します。ツールチップアイコンはアクティビティパネル上でアクティビティ名の左側や、デザイナーパネル上でのアクティビティの左上にあるアイコンのことです。
これを変更するにはtheme\Icons.xamlファイルにIconのデータを記述する必要があります。記述するデータの生成方法ですがMicrosoft Expression Designなどで作成する、SVG-xamlの変換ツールを利用するなどがあります。
Activity CreatorではDrawingBrush要素の x:Key属性にアクティビティ名+"Icon"を設定することにより、これがそのアクティビティ名のIconと認識されるようにできています。例えば以下を追加するとTestSumアクティビティのIconとなります。
<DrawingBrushx:Key="TestSumIcon"Viewbox="0,0,52.706,14.497"ViewboxUnits="Absolute"Stretch="Uniform"><DrawingBrush.Drawing><DrawingGroupx:Name="DrawingLayerGetWarning"><DrawingGroup.ClipGeometry><RectangleGeometryRect="0,0,192,192"/></DrawingGroup.ClipGeometry><GeometryDrawing><GeometryDrawing.Pen><PenBrush="#00FFFFFF"Thickness="1"/></GeometryDrawing.Pen><GeometryDrawing.Geometry><RectangleGeometryRect="0,0,192,192"/></GeometryDrawing.Geometry></GeometryDrawing><DrawingGroup><DrawingGroup.Children><GeometryDrawingBrush="#FFE9E90B"Geometry="F1 M 93.6697,26.6973L 19.1666,153.263L 168.42,153.117L 93.6697,26.6973 Z "><GeometryDrawing.Pen><PenThickness="2"LineJoin="Round"Brush="#FF000000"/></GeometryDrawing.Pen></GeometryDrawing><GeometryDrawingBrush="#FF000000"Geometry="F1 M 89.8066,124.033L 87.2466,73.4926L 87.2466,52.3526L 98.7666,52.3526L 98.7666,73.4926L 96.2066,124.033L 89.8066,124.033 Z M 87.2466,144.513L 87.2466,132.993L 98.7666,132.993L 98.7666,144.513L 87.2466,144.513 Z "/></DrawingGroup.Children></DrawingGroup></DrawingGroup></DrawingBrush.Drawing></DrawingBrush>以下のようにアイコンが変わりました。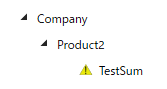
次回はスコープをもったアクティビティについて説明します。
(その4終わり)